Graph Traversals in C++
Graph traversals in the form of Depth-First-Search (DFS) and Breadth-First-Search (BFS) are one of the most fundamental algorithms in computer science. As the use of these algorithms plays an essential role in tasks such as cycle-detecting, path-finding, and topological sorting. For that reason, it is important to know how to implement a simple generic version of these functions.
The first point to consider before implementing a graph traversal algorithm is to identify what type of graph we want to traverse. To select a graph we have to ask ourselves if we want the graph to be directed or undirected? Will the graph be disconnected? Will it support cycles? In the case of this blog post, I decided to use an undirected graph. What this means is that the traversal algorithms may need slight modifications depending on the type of graph being used; nevertheless, the fundamental structure of the algorithm will remain the same.
The undirected graph presented in this example will use an adjacency list representation. The graph is implemented using a hash map of key-value pairs between each vertex and the list of neighbor vertices around it. The implementation of the undirected graph is presented below:
Graph Implementation:
template<typename VertexType>
using UndirectedGraph = std::unordered_map<VertexType, std::vector<VertexType>>;

template<typename VertexType>
void addEdge(UndirectedGraph<VertexType>& undirected_graph,
    const VertexType& source, const VertexType& destination)
{
    undirected_graph[source].push_back(destination);
    undirected_graph[destination].push_back(source);
}
Now that we have established an implementation for the graph, we can start thinking about the design of the traversals. In the case of graphs, the options for traversals are Depth-First-Search(DFS) and Breadth-First-Search(BFS). DFS is characterized by starting from a given vertex and then following a path until it ends, then it backtracks to the next possible path following the same procedure until the whole graph is traversed. In the case of BFS, the traversal begins at any selected vertex from where we begin to visit the neighbor vertices at the same depth level, and then move onto each level subsequently until the graph is fully traversed. A graphical visualization of both types of traversals in a tree graph is presented below:

Breadth First Search (BFS) Visualization

Depth First Search (DFS) Visualization
In regards to the implementation details of DFS and BFS, there are various commonalities shared between both algorithms. The main one being the use of a set to keep track of the visited nodes to prevent the traversal from being stuck in a cycle. The key difference between them is the use of a different data structure to process the order of each vertex. For DFS a stack is used as the Last-In-First-Out (LIFO) order serves the purpose of traversing down a path and then backtrack as the traversal reaches its end. While in BFS a queue is used as its First-In-First-Out structure helps navigate each vertex on a level by level basis. The generic implementation for both traversals is presented below:
BFS Implementation:
template<typename VertexType, typename Function = std::invoke_result<void(VertexType&)>::type>
void BFS(const UndirectedGraph<VertexType>& undirected_graph, VertexType current_vertex,
    const Function& process_vertex_function)
{
    std::queue<VertexType> queue;
    queue.push(current_vertex);

    std::unordered_set<VertexType> visited_vertices;
    visited_vertices.insert(current_vertex);

    while (!queue.empty())
    {
        current_vertex = queue.front();
        queue.pop();

        process_vertex_function(current_vertex);

        for (auto neighbor_vertex : undirected_graph.at(current_vertex))
        {
            if (!visited_vertices.count(neighbor_vertex))
            {
                visited_vertices.insert(neighbor_vertex);
                queue.push(neighbor_vertex);
            }
        }
    }
}
DFS Implementation:
template<typename VertexType, typename Function = std::invoke_result<void(VertexType&)>::type>
void DFS(const UndirectedGraph<VertexType>& undirected_graph, VertexType current_vertex,
    const Function& process_vertex_function)
{
    std::stack<VertexType> stack;
    stack.push(current_vertex);

    std::unordered_set<VertexType> visited_vertices;

    while (!stack.empty())
    {
        current_vertex = stack.top();
        stack.pop();

        if (visited_vertices.count(current_vertex))
        {
            continue;
        }

        visited_vertices.insert(current_vertex);

        process_vertex_function(current_vertex);

        for (auto neighbor_vertex : undirected_graph.at(current_vertex))
        {
            stack.push(neighbor_vertex);
        }
    }
}
Usage Example:
int main()
{
    UndirectedGraph<int> graph;

    addEdge(graph, 1, 2);
    addEdge(graph, 2, 6);
    addEdge(graph, 1, 3);
    addEdge(graph, 3, 5);
    addEdge(graph, 4, 5);
    addEdge(graph, 5, 7);
    addEdge(graph, 6, 7);

    auto print_vertex = [](auto& vertex)
    { std::cout << vertex << ' '; };

    std::cout << "BFS: ";
    BFS(graph, 1, print_vertex);

    std::cout << '\n';

    std::cout << "DFS: ";
    DFS(graph, 1, print_vertex);
}
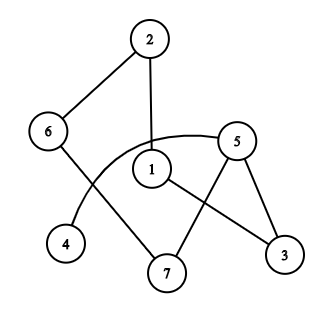
Graph Used in Example
Output:
BFS: 1 2 3 6 5 7 4
DFS: 1 3 5 7 6 2 4
Conclusion
Breadth-First-Search and Depth-First-Search traversals have a wide range of applications in many algorithms, thus it is essential to understand their theory and implementations. While there are various kinds of graphs with unique properties, the general structure of DFS and BFS remains very similar. Lastly, if you are interested in additional graph algorithms and more robust implementations make sure to take a look at The Boost Graph Library.